 ramblz
 progrz
 thangz
 fotoz
fotozTerrain and lighting in Todd the Caver
This is a quick post to show how I created the terrain and lighting in my Ludum Dare 48 compo entry, Todd the Caver.
Play Todd the Caver your browser here on Itch.io.
Creating Terrain from Collision
Terrain geometry is built in editor using CollisionPolygon2D. This turned out to be an incredibly quick and effective workflow during the jam, as creating new areas to explore was as simple as building it with Godot’s great polygon editing tools.
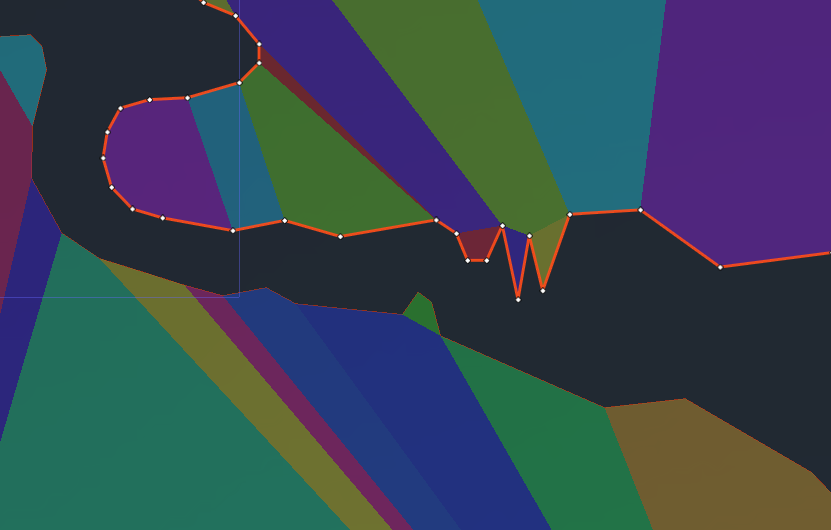
This was all the authoring I had to do for Tedd the Caver, the render mesh and occlusion mesh were generated in code from the collision polygon.
Edge Lighting
Nothing more than simple 2D sprite lighting was used for the lighting effects in Todd the Caver. There’s no fancy shader or anything. The only somewhat novel technique I used was to achieve the pixel-wide border lighting around the edge of the terrain, which I thought gave a really nice aesthetic.

This was done simply by duplicating the terrain render mesh four times, and offsetting it by 1 pixel in each cardinal direction. Since the light occlusion mesh remained in the ‘centre’ of these offset render meshes, light around the edge would not be occluded.
Here’s what the scene tree for this setup looks like.
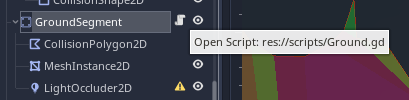
I split the terrain up into similarly sized segments (perhaps a few hundred verts in each collision polygon). I found adding too many verts to a single collision polygon would begin to lag the editor, and I expect a physics body with too many verts wouldn’t be great for runtime performance either.
Here’s the first part of the script attached to the ground static body, that takes the collision polygon we built in the editor and converts it into a mesh we can render using Godot’s Geometry.triangulate_polygon() method.
extends StaticBody2D

onready var _collisionPoly = get_node("CollisionPolygon2D")
onready var _mesh = get_node("MeshInstance2D")
onready var _lightOccluder = get_node("LightOccluder2D")

func _ready():
	# create an array mesh and array to store our geometry in
	var arr_mesh = ArrayMesh.new()
	var arrays = []
	arrays.resize(ArrayMesh.ARRAY_MAX)

	# get all verts from collision shape we created in editor
	var vert_array = _collisionPoly.polygon
	arrays[ArrayMesh.ARRAY_VERTEX] = vert_array

	# collision polygon stores a list of verts defining the outline of the shape
	# this is no good for rendering, we need to make a list of triangles from those points
	# thankfully, Godot has a method just for this!
	arrays[ArrayMesh.ARRAY_INDEX] = Geometry.triangulate_polygon(vert_array)
	arr_mesh.add_surface_from_arrays(Mesh.PRIMITIVE_TRIANGLES, arrays)
	_mesh.mesh = arr_mesh
Finally, the second half of the script duplicates the render meshes four times and applies the 1 pixel offsets, then creates the light occlusion mesh.
	# duplicate the mesh 4 times, offset by 1px in each direction
	_mesh.modulate = Color("b3a6a3")
	var duplicated = _mesh.duplicate()
	duplicated.position.x += 1.0
	add_child(duplicated)
	duplicated = _mesh.duplicate()
	duplicated.position.x -= 1.0
	add_child(duplicated)
	duplicated = _mesh.duplicate()
	duplicated.position.y += 1.0
	add_child(duplicated)
	duplicated = _mesh.duplicate()
	duplicated.position.y -= 1.0
	add_child(duplicated)

	# set original (centre) mesh to black (so it won't get lit)
	# z_index to 1 means it draws above the four offset meshes
	_mesh.modulate = Color.black
	_mesh.z_index = 1

	# finally, setup our light occluder using the collision vert data
	var occluder = OccluderPolygon2D.new()
	occluder.set_polygon(_collisionPoly.polygon)
	_lightOccluder.occluder = occluder
And that’s all there is to it!
Finishing Touches
The light on the Todd’s head is simply a Light2D with a cone shaped sprite, pointed in the direction of the mouse. Remember to enable shadows on the light.
The only other important part of the lighting setup is added a CanvasModulate object somewhere in the scene, with a dark colour (mine was a deep dark blue, #120e33). This object simply darkens all canvas objects (aka Sprites) in your scene so that they are shadowed in the absence of light. All a Light2D does is add (or multiply/mix/sub depending on the type) colour to the sprite to simulate light.
For the shafts of light during the rope bridge section (see the .gif at the top of the page), I simply left some gaps in the terrain geometry, and added a big Light2D above the scene to simulate the moon.
I hope this is useful for somebody, let me know if you use this technique in your game!
Comments
Post comment